Monday, June 30, 2014

Zend Server Deployment : With the help of ZPK File

Deployment of ZPK file of your application is pretty simple as compared to ZPK file creation.

Minimum requirement of the ZPK file deployment is installed Zend-Server version 6.2 on your system.

Once Zend-Server installed, just logged-in into zend-server, where you will see the home screen like as :


Here, You will see the Application tab where you can deploy the zpk file of your application.

click on the "Application -> Apps" tab, then you will see the below screen as:


Here, you will see the number of application deployed in "Name" column.
Now click on "Deploy Application" then select your ZPK file to deploy.


Here, you will see option to upload the zpk file, upload your ZPK file and click next:


Fill the "Display Name" which will appear in the "Name" column after deploy. Here, you can add your virtual host name where your application will resolve. Path field is optional, if you add path then Url would be like as:
"http://cmdpglock.in:80/path"

After fill the all detail, click "Next". after that you will see the Licence agreement screen as:


Just accept the agreement of Licence, then click "Next".

Here, you will see all the Prerequisites for the application deploy, If all are okey, then click "Next" :

Fill "Host" as your Hosting server address, Database credentials etc. then click "Next" for the final deployment:
Click on Deploy, you will see the updated screen with your deploy name in "Name" column.

Now open the host URL of your site in your browser, your will see that your site is working.

Its Easy and simple :)

Here, now question is where is your virtual hosting occur at server level?

Virtual-host is setup at zend-server installation via creating a new .conf file at "/usr/local/zend/etc/site.d/" location and your application content stored at "/usr/local/zend/var/apps/http/" location.

Cool...

I hope above content would be helpful for the deploy process.


Thursday, June 26, 2014

Creating an Application Package(.ZPK) for Deployment on Zend Server

Hi,

This article is aimed to help you better understand how to better deal with deployments in your development workflow and provide some best practices for deployments. Sometimes a bad production deployment can ruin all the effort you invested in a development process. Having a solid deployment workflow can become one of the greatest advantages of your team.

So what actually is deployment means ?

Deploying an application is the process of copying, configuring and enabling a specific application to a specific base URL on Zend Server or on a cluster. Once the deployment process has finished, the application becomes publicly accessible on the base URL. The server carries out this two step process by first staging the application, and then activating it after successful staging.


The deployment mechanism in Zend Server uses a ZPK file, which contains the source code, assets and the deployment descriptor.

Application Package(.zpk) file for the deployment on Zend Server can be created via a Zend-Studio GUI OR Linux console.Both are ease to implement.

Via Zend-Studio IDE: This is for GUI lover :)

Step 1: 
From Zend IDE, select your application for which you want to create the zpk file.

Step 2: 
Right click on the application, then selecting “Add Application Deployment Support”

 
It will create deployment.xml file in your aplication and opens it on your IDE.

Step 3: 
Screen that you will get on your IDE is:


Most of the fields are self explanatory but a few might require a few words.
  • Document Root – This is the document root which is relative to the base directory of the deployment. 
  • License – This is the relative path to a text file in the project directory structure that contains the EULA for the project.  During the deployment work-flow in the UI the end user will be presented with this if the file is available and will be required to agree to it before proceeding.
  • Persistent Resources – These are items that you don’t want to have overwritten during an upgrade.  For example, cache directories.

Dependencies

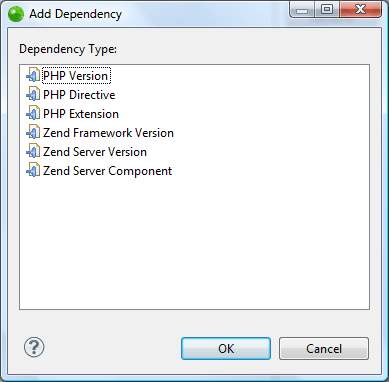
There are several different types of dependencies you can specify for your application.
These dependencies will be checked prior to deploying the application.  If they are not satisfied then the application will not deploy.

Triggers

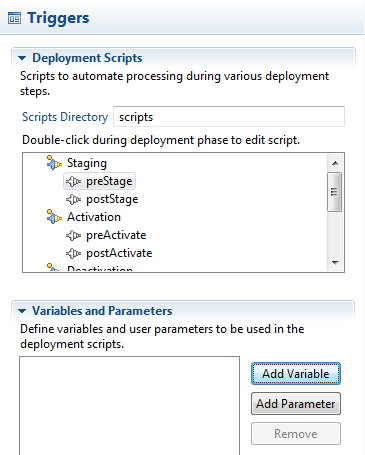
There are several triggers that can be hooked into during the deployment process, each of which has a Pre and Post stage
  • Activate
  • Deactivate
  • Stage
  • Unstage
To set up a trigger simply double click on the stage that you would like to edit and a new file will be created for you.  In that file will be documentation on information on how to retrieve variables and parameters for your deployment scripts.
Speaking of variables and parameters, what is the difference?  There are two differences.
  1. Variables you cannot change during the deployment process.  What the value is in the deployment file is the value that you will get in the deployment script.  Parameters need to be specified during the deployment work-flow and also have some validation that you can do on the entered values whereas with variables you do not.
  2. Both are accessible via getenv() during deployment but variables are retrieved with their names “as is” but parameters are upper cased and prepended with “ZS_”.  So if you have a parameter named “ugly_Duckling” it would be accessed via getenv(‘ZS_UGLY_DUCKLING’)

Package

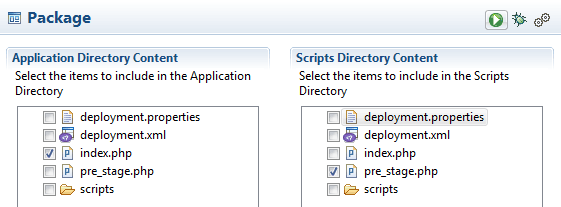
There may be files in your application that you want to include or exclude.  You can specify those in the Package panel.
 
Exporting
The last step is to export your project.  Right click on the project and select Export and choose “Deployment Package”.  This will output the project into a ZPK file that you can then upload to your Zend Server instance or Zend Application Fabric installation where it will be deployed to your website. 


=================================================
 Via Linux Console : This is for Command line lovers :)
=================================================

Here, i am using Zend's Deployment Tool that allows you to create a skeleton package, and pack the contents into a .zpk package.

Tool location - The tool is located in:
  • Linux - '/usr/local/zend/bin/zdpack'
  • Windows - 'C:Program Files\Zend\ZendServer\bin\zdpack' -OR- as a 
  • standalone (if downloaded separately from the product).

Usage - Run the help command (Linux: '<install_dir>/bin/zdpack --help'; Windows: 'zdpack.exe --help') from the bin directory to see the usage.

The command line actions are:
Step 1
Select a directory and use the create command (Linux: '<install_dir>/bin/zdpack create <application-name>'; Windows: zdpack.exe create <application-name>'
where is your application's name) to create the skeleton of your .zpk package. This includes the XML descriptor file, the data folder and the hook scripts (templates).
Go to the directory to see the resources that have been created:
  • Data folder - The folder that will contain your application files.
  • Scripts folder - The hook script skeletons available for you to edit as needed. 
  • deployment.xml file - The template of the XML descriptor for you to edit as needed.

Step 2:
Perform the following actions:
  • Place your application files in the data folder. 
  • Edit the hook scripts according to your needs. 
  • Edit the XML file as needed. The XML template is made up of example elements.  
  • Validate the package by using the validate command (Linux: '<install_dir>/bin/zdpack validate [--schema=<xsd-file>] <package-xml-descriptor-file>'; Windows: 'zdpack.exe validate [--schema=<xsd-file>] <package-xml-descriptor-file>'). 

For example:
# /usr/local/zend/bin/zdpack validate --schema="/usr/local/zend/share/deployment.xsd" deployment.xml


NOTE: For ZF2 application zpk file creation, I edit the deployement.xml file for the document root settings i.e.
<docroot>data</docroot> 
TO 
<docroot>data/public</docroot>

Step 3:
Use the pack command (Linux: '<install_dir>/bin/zdpack pack <application-name>'; Windows: 'zdpack.exe pack <application-name>') to pack the contents into a .zpk package. By default, the Deployment Tool will create the package in the working directory.
For Example:
# /usr/local/zend/bin/zdpack pack my_application_dir


Once you have a .zpk application package ready and packed, you can deploy your application OR update an existing application.


--
Bye Buddy

Monday, June 23, 2014

OOP : When to prefer an Abstract Class and Interface

Hi,

Abstract classes allow you to provide default functionality for the subclasses.

Why is this extremely important though?
If you plan on updating this base class throughout the life of your program, it is best to allow that base class to be an abstract class.

Why?
Because you can make a change to it and all of the inheriting classes will now have this new functionality.

If the base class keep on changing and an interface was used instead of an abstract class, we are going to run into problems. Once an interface is changed, any class that implements that will be broken. Now if it's just you working on the project, that’s no big deal. However, once your interface is published to the client, that interface needs to be locked down. At that point, you will be breaking the clients code.

As per my personal experiences, frameworks is a good place to show when and where to use both an abstract class and an interface.

Another general rule is if you are creating something that provides common functionality to unrelated classes, use an interface. If you are creating something for objects that are closely related in a hierarchy, use an abstract class.

An Example of this would be something like a business rules engine. This engine would take in multiple BusinessRules as classes perhaps? Each one of these classes will have an analyze function on it.

public interface BusinessRule{
     Boolean analyze(Object o);
}

This can be used ANYWHERE. It can be used to verify the state of your application. Verify data is correct. Verify that the user is logged in. Each one of these classes just needs to implement the analyze function, which will be different for each rule.

Where as if we were creating a generic List object, the use of abstract classes would be better. Every single List object is going to display the data in a list in some form or another. The base functionality would be to have it go through its data provider and build that list. If we want to change that List object, we just extend it, override our build list function, change what we want and call super.buildList();

In Brief: interfaces means you are just defining a list of functions and that abstract classes has the option of providing default functionality.